
Showing posts with label recipes. Show all posts
Showing posts with label recipes. Show all posts
Wednesday, September 5, 2012
Mead making part three

Tuesday, August 28, 2012
Mead making part two
Now that your fruit and water mixture has been sitting for 7-10 days, its time to strain it and
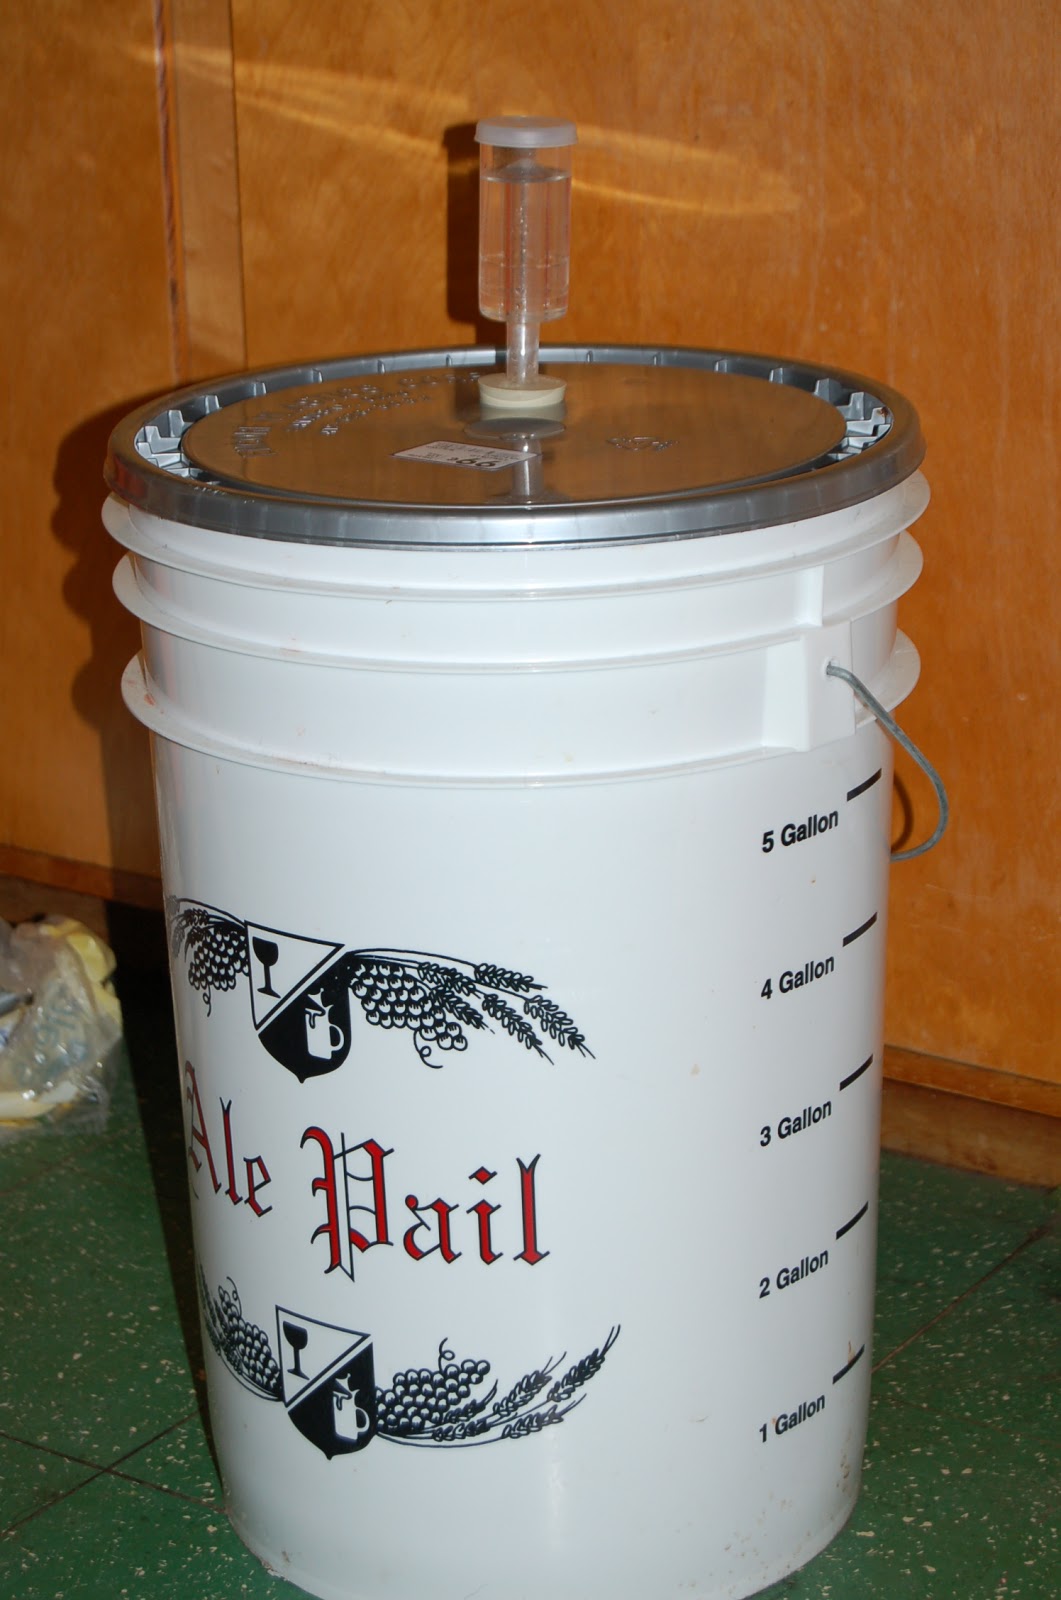
 add the honey and nutrient. I take a large bucket and put a strainer across the top. I then put a piece of cheesecloth over the strainer so that all the little pieces get strained out of the liquid. Once I dump all the liquid through the strainer, I let it sit for a couple hours to be sure that all the juice gets out of the pulp. Next I add the honey. The recipe calls for 3 lbs of honey per gallon of the final amount of mead. Since this is going to be a 5 gallon batch, I would use 15 lbs of honey. However, since watermelon is very sweet, I'm going to try to only add 2 lbs of honey per gallon for a total of 10 lbs. This should make the mead more flavorful and less percent of alcohol. This should still be
 plenty strong enough because the standard 3 lbs per gallon makes fairly strong alcohol. I have yet to actually measure the alcohol content of my mead, but it is obviously quite potent. I like to add the honey when it is slightly warm so that it blends in well. It shouldn't be hot because it will kill the yeast. The next thing you add is the yeast nutrient. The kind I have says to add 1/2 teaspoon per gallon, but a different kind may vary in amount needed. Mix this all up really well and put the lid on the bucket with the airlock in place. At this point you do not want any bacteria getting into your mead because you could end up with vinegar. Let this mixture sit in the bucket for another 7-10 days and stay tuned for the next step!

Thursday, August 23, 2012
Cooking in season: Garden Chili

First thing the next day I will turn the low heat back on the tomatoes and cook the beans. Bring them to a boil and them simmer for about an hour. While the beans are cooking, chop up the rest of your vegetables. You can add whatever you have laying around really. I am going to add onion, peppers (hot and sweet), garlic, zuchetta, and some eggplant. I also add chili powder and bulgur wheat. I can't really tell you how much of each I add, I just throw in what I have and then taste as I go to see how the spices are. You can always add more so don't go too crazy initially. Let this cook in the crock pot until dinner time. Be sure to give it a mix occasionally throughout the day. Other vegetables that are good in this chili if you have them are: corn, carrots, parsnips, turnips, spaghetti squash, or anything else really. Just remember when you are adding things that your chili will be different every time, but that is half the fun of making it in season.

Saturday, July 28, 2012
Cooking in season: Pasta-less zucchini primavera and Raw cucumber appetizer

Pasta-less Zucchini Primavera
Ingredients:
1 large zucchini, shredded
1 large tomato, diced
1 handful of green beans, chopped
1 sweet pepper, diced
2-3 carrots, chopped
3 cloves garlic, minced
olive oil for sauteing
(any other vegetables you may have should work)
Directions:
In this recipe, the zucchini will function as the pasta to make it a low carb meal. If you want pasta, use pasta. It will be good either way. Put garlic and olive oil into a saute pan on medium heat for about 5 minutes or until garlic browns. Add in the rest of the vegetables and continue to saute until the vegetables reach your desired texture. I cook mine for about eight minutes to keep them on the crunchy side.


Raw Cucumber Appetizer
Ingredients:
2 cucumbers, sliced
1 baguette or skinny loaf of italian bread, sliced
(a big loaf won't work)
1 bunch fresh cilantro, chopped
1 small bunch fresh dill, chopped
16 ozs cream cheese
4 cloves garlic, minced
Directions:
Combine cream cheese, garlic, cilantro, and dill. Put a spoonful of the cheese mixture on each slice of bread. Top with a cucumber.
Monday, July 9, 2012
Solar cooker cooking: Sweet potatoes, Garbanzo beans

Wednesday, June 27, 2012
Cooking in Season: Spring "Garbage" Pizza and Pizza Dough

Toppings:
Garbage pizza means whatever you have left over goes on your pizza
The pizza shown has pesto, mozzarella, broccoli, and zucchini
Dough Ingredients:
3/4 cup warm water
1 tablespoon sugar
1 teaspoon yeast
2 cups bread flour
2 cups whole wheat flour
3 1/2 tablespoons salt
1 1/2 tablespoons sugar
1 cup water
3 tablespoons olive oil
Directions:
Combine first three ingredients, whisk and set aside. Mix flour, salt, and sugar. Add water and olive oil. Add yeast mixture. Mix and then knead for about ten minutes. Place in oiled bowl and cover to rise in warm place. Once the dough has doubled, about an hour, punch down and knead for 5 minutes. Split into two dough balls. Will keep in the refrigerator for 3-4 days, also good to freeze.
Saturday, June 23, 2012
Cooking in Season: Kohlrabi "pizzas" and Spring Stir Fry

Ingredients:
1 Kohlrabi
What ever toppings you like
I used garlic, olive oil, basil, spinach, and parmesan cheese
Directions:
Preheat the oven to 350. Slice the kohlrabi into about 1/4 in slices. Put some olive oil on a baking sheet and then add the kohlrabi slices. Bake about 15 minutes depending on how soft you want the slices, then flip and cook another 15 minutes. Throw the toppings on the cooked slices and bake about 10 minutes or until the cheese is good and melty.

Ingredients:
Olive oil
Teriyaki or any other kind of stir fry sauce
Any vegetables you have laying around
I used chinese cabbage, turnip, golden beets and mushrooms
Directions: Put the olive oil in a sautee pan on medium heat. First add whichever vegetables will take the longest to cook and the sauce and then work your way to the shortest cooking times. I started with beets and turnips, then added the white parts of the cabbage and the mushrooms, and finally the green part of the cabbage. Stir continuously until the vegetables are at the desired texture. I like crunchy vegetables, so I didn't cook them for very long.
Saturday, June 16, 2012
Cooking in Season: Stuffed Mushrooms and Garlic Scape Pesto

Ingredients:
One batch of pesto, any kind you like
6 portobello mushroom tops
2 cups of rice, cooked
Parmesan cheese, shredded
Directions:
Preheat oven to 350 degrees. Put a small handful of rice in each mushroom top. Add a scoop of pesto to each mushroom.
Sprinkle with parmesan. Bake for about 20 minutes.
Ingredients
6 garlic scapes
1/3 cup pumpkin seeds
5 basil leaves
1/4 cup parmesan
1/2 teaspoon salt
1/2 teaspoon pepper
juice from half a lemon
3/4 - 1 cup olive oil
Directions
Place all ingredients into the food processor and pulse until smooth.
Friday, June 8, 2012
Cooking in Season: Caribbean Pak Choy and Pesto

Ingredients:
2 lbs Pak Choy
2 Tsp oil
1/2 cup diced onions
Minced hot pepper to taste
2 cloves garlic, crushed
Salt and pepper to taste
(mushrooms if you have them laying around)Directions:
Cut off the root at the bottom of each bunch of Pak Choy. Chop up the Pak Choy - white and green parts. Heat oil in a wok or very large pan until very hot. Toss in onions, pepper and garlic let cook for 1 - 2 minutes. Add Pak Choy (and mushrooms) and toss continuously until the green leaves wilt. Remove from heat immediately, season with salt and serve right away.
Spinach Chive Pesto
Ingredients:
2 heaping cups chopped fresh spinach leaves
1/3 cup chopped fresh chives
2 ounces grated Parmesan cheese
½ cup chopped walnuts, lightly toasted
¼ teaspoon coarse salt
¼ teaspoon freshly ground black pepper
2 cloves garlic, chopped
1 tablespoon lemon juice
¼ cup olive oil, preferably extra-virgin
Directions:Place the spinach, chives, Parmesan, walnuts, salt, pepper, garlic, and lemon juice in the bowl of a food processor. Process until the mixture is coarsely pureed, scraping down the sides occasionally to incorporate all the ingredients.
With the machine running, slowly pour in the olive oil (through the top opening of the processor) and process until smooth. Stop and scrape the sides of the bowl as necessary.
1/3 cup chopped fresh chives
2 ounces grated Parmesan cheese
½ cup chopped walnuts, lightly toasted
¼ teaspoon coarse salt
¼ teaspoon freshly ground black pepper
2 cloves garlic, chopped
1 tablespoon lemon juice
¼ cup olive oil, preferably extra-virgin
Directions:Place the spinach, chives, Parmesan, walnuts, salt, pepper, garlic, and lemon juice in the bowl of a food processor. Process until the mixture is coarsely pureed, scraping down the sides occasionally to incorporate all the ingredients.
With the machine running, slowly pour in the olive oil (through the top opening of the processor) and process until smooth. Stop and scrape the sides of the bowl as necessary.
Swiss Chard and Pecan Pesto
Ingredients:
1/2 cup olive oil, divided 10 leaves Swiss chard, chopped 4 cloves
garlic, chopped 1 cup basil leaves 1 cup pecans 1/2 teaspoon sea salt
1 tablespoon lemon juice 1 (3 ounce) package grated Parmesan cheese
salt and ground black pepper to taste
Directions:
Heat 2 teaspoons of the olive oil in a skillet over medium heat; cook
and stir the Swiss chard and garlic in the hot oil until the chard
leaves have wilted, 3 to 5 minutes. Remove from heat and allow to
cool.
Process the basil, pecans, sea salt, Parmesan cheese, and remaining
olive oil in a food processor until all the ingredients are well
integrated. Add the Swiss chard mixture and the lemon juice to the
food processor; continue chopping until the mixture is pureed. Season
with salt and pepper.
Ingredients:
1/2 cup olive oil, divided 10 leaves Swiss chard, chopped 4 cloves
garlic, chopped 1 cup basil leaves 1 cup pecans 1/2 teaspoon sea salt
1 tablespoon lemon juice 1 (3 ounce) package grated Parmesan cheese
salt and ground black pepper to taste
Directions:
Heat 2 teaspoons of the olive oil in a skillet over medium heat; cook
and stir the Swiss chard and garlic in the hot oil until the chard
leaves have wilted, 3 to 5 minutes. Remove from heat and allow to
cool.
Process the basil, pecans, sea salt, Parmesan cheese, and remaining
olive oil in a food processor until all the ingredients are well
integrated. Add the Swiss chard mixture and the lemon juice to the
food processor; continue chopping until the mixture is pureed. Season
with salt and pepper.
Thursday, May 31, 2012
Cooking in season: Kale with mustard dressing, Warm Chard and Mushroom Salad
A huge part of homesteading is cooking is season. Rather than going to the store and buying whatever you feel like, you go to the garden and pick what is ripe. The choice you make is how to prepare them. Since we don't yet have a garden big enough to really feed us, we take part in a local CSA. This means that we pay them in advance and we get a weekly supply of fresh veggies, whatever is in season. I think this is a great way to force ourselves to learn to cook in season. Our ingredients for the week are: Kale, Chard, Romaine, Lettuce (not sure what kind), Bok Choi, Basil, Anise, and Beet greens.

Kale with Mustard dressing:
Ingredients
9 oz kale
3 tbsp olive oil
1 tsp whole grain mustard
1 tsp white wine vinegar
1 tsp agave syrup
salt and pepper to taste
Directions: Whisk all ingredients except the kale together. Pour over kale.
Warm Chard and Mushroom Salad:
Ingredients
1 tablespoon olive oil
2 cloves garlic, minced
1 bunch Swiss chard, cut into thin strips
10 cremini mushrooms, sliced
1/4 cup chopped onion
3 tablespoons balsamic vinegar
12 grape tomatoes, quartered (I know they aren't in season, you don't need them)
2 tablespoons crumbled blue cheese
1 pinch salt
Ground black pepper to taste
Directions
Heat the olive oil in a skillet over medium-low heat. Cook the garlic
in the oil until just fragrant, about 1 minute. Add the Swiss chard to
the garlic and cook until wilted, 3 to 5 minutes; transfer the chard
and garlic to a bowl, reserving any liquid in the skillet and
returning it to the heat.
Cook the mushrooms and onion to the reserved liquid in the skillet
until warmed, 2 to 3 minutes. Pour the balsamic vinegar over the
mushroom and onion mixture; cook and stir another 2 to 3 minutes; add
to the bowl with the chard mixture along with the tomatoes. Gently mix
to incorporate. Toss with the blue cheese. Season with salt and pepper
to serve.


Kale with Mustard dressing:
Ingredients
9 oz kale
3 tbsp olive oil
1 tsp whole grain mustard
1 tsp white wine vinegar
1 tsp agave syrup
salt and pepper to taste
Directions: Whisk all ingredients except the kale together. Pour over kale.
Warm Chard and Mushroom Salad:
Ingredients
1 tablespoon olive oil
2 cloves garlic, minced
1 bunch Swiss chard, cut into thin strips
10 cremini mushrooms, sliced
1/4 cup chopped onion
3 tablespoons balsamic vinegar
12 grape tomatoes, quartered (I know they aren't in season, you don't need them)
2 tablespoons crumbled blue cheese
1 pinch salt
Directions
Heat the olive oil in a skillet over medium-low heat. Cook the garlic
in the oil until just fragrant, about 1 minute. Add the Swiss chard to
the garlic and cook until wilted, 3 to 5 minutes; transfer the chard
and garlic to a bowl, reserving any liquid in the skillet and
returning it to the heat.
Cook the mushrooms and onion to the reserved liquid in the skillet
until warmed, 2 to 3 minutes. Pour the balsamic vinegar over the
mushroom and onion mixture; cook and stir another 2 to 3 minutes; add
to the bowl with the chard mixture along with the tomatoes. Gently mix
to incorporate. Toss with the blue cheese. Season with salt and pepper
to serve.

Subscribe to:
Posts (Atom)